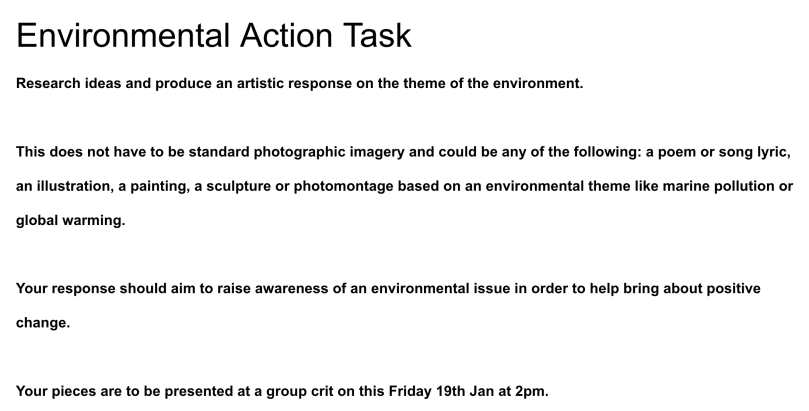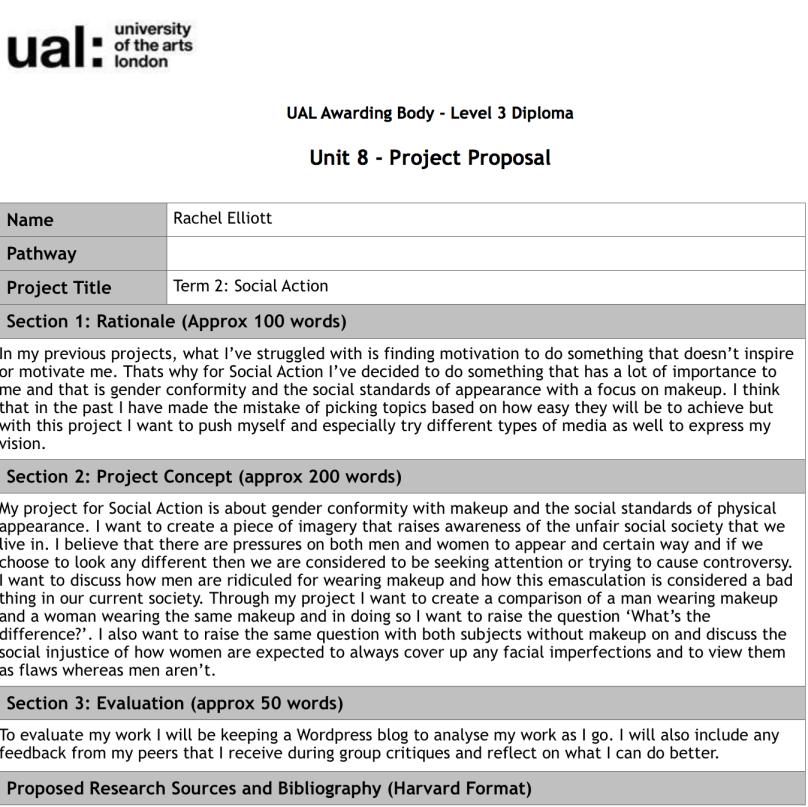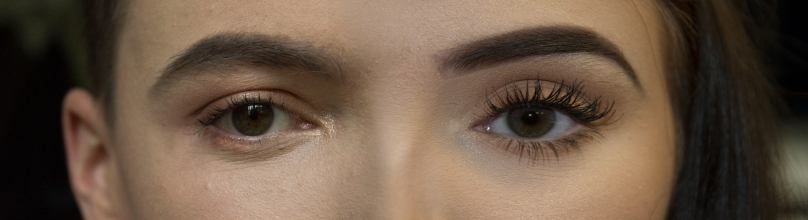
Pictured above is the image that I am using as my final image for this project. I am really happy with this outcome as I feel it represents my theme and my concept of battling the social standards of men and women well. I wanted to create something that brought men and women together as equals and showed that there is no difference between a man wearing makeup and a woman wearing makeup. By combining two portraits together it portrays the idea that they are the same person which is exactly what I was aiming to do.


To create the image I got two portraits that I took during this project that are pictured above. I opened them up in Photoshop and put them onto an A3 canvas. I lined them up so the eyes were at the same height but I came across the issue that the female subject’s eyes were a lot wider and the distance between her eye and eyebrow were greater than the male subject. To resolve this issue I manipulated the image by compressing it down and ‘squishing’ it slightly to make her eye the same kind of height as the male subject’s whilst at the same time reducing the distance between her eye and eyebrow. This worked perfectly and it meant that everything was lined up. I then put the image of the male subject on top of the female one and moved it to the right until the centre of their noses were fairly aligned. This was quite difficult as their noses are at difference angles so I cropped the ends of their noses out to make it easier. Now that their faces were together and lined up I still had three issues with the picture: there was a line going down the centre separating the two images, there was a clear skin tone difference, and their eyes were completely opposite colours which made a clearer difference between the two people. I wanted it to seem as though it could pass as one individual and so these were big problems.
The first problem I tackled was the skin tone issue. I went onto the female image and using the selective colour tool I went into the ‘red tones’ and reduced the magenta slider, and increased the yellow and black slider. This levelled things out really well and created a good balance between the skin tones.
I then decided to resolve the issue of the separation line of the images. To do this I flattened the image, merging the two pictures together, and used the stamp tool to move down the nose to try and create a seamless blend between the images. This didn’t really work too well as it created more differences in the skin and the skin on the nose was a different shade to the one I was stamping on. I then decided to go back and instead of doing that I made a layer mask on the layer that was on top rather than merging the images by flattening, I erased using a very low opacity to reveal the layer underneath subtly. This created a beautiful blend which is pictured at the top and I think this worked really effectively.
To address the issue of the eye colours, I tried using the paint tool to darken the blue eye but it didn’t create a perfect shade. So what I did to correct this was select the male’s eye and copy it and paste it on top of the female’s eye. I changed the layer blend mode to ‘colour’ and this seemed to work perfectly as it made the eye colours almost the exact same.
Overall, I’m really impressed with how this turned out as it relates strongly to the theme of gender nonconformity and the social standards of men and women that I wanted it to. The only thing I would improve about it if I could would be to make the nose straighter so it was a more seamless blend. Despite this, I’m still really happy with this outcome.
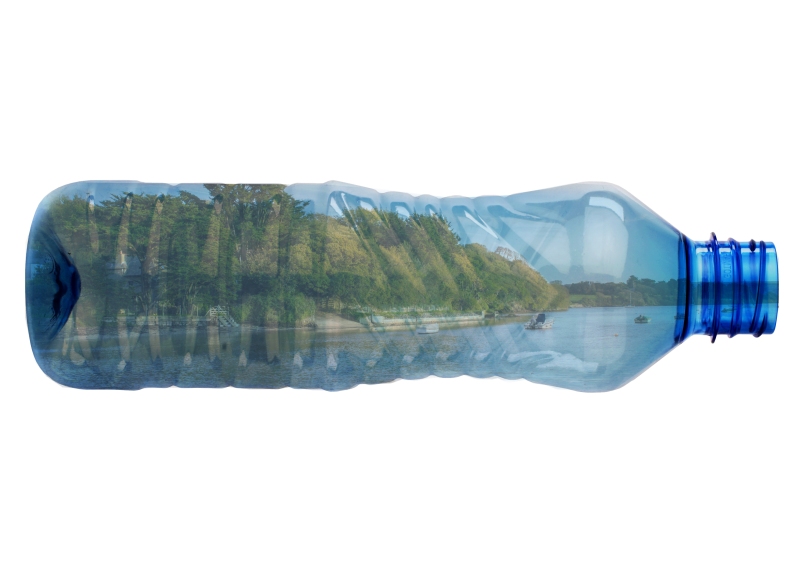 This is my final image for the environmental weekly brief. Going against my original plans, I decided to scrap the idea of a collage after failed attempts and decided to create something in Photoshop. My initial idea was to edit images of bottles into the ocean to create an ocean of bottles but it looked rather amateur and I gave up. However, I took a look at my work to see what I could do to improve it and thought, what if I put the ocean in the bottle instead? So I used the landscape image I took at Bowcombe bridge a couple months ago and found a picture of a clear bottle online and produced this outcome. I think it creates a pretty strong concept of how we live in a plastic world now. I was also inspired by the ships inside bottles you can get as that made me think about how I could put the ocean inside a bottle.
")